Sharing Omnis libraries on GitHub
GitHub.com is the premier tool for sharing source code. Using the JSON export tool in Omnis Studio 8.1, Omnis developers can easily share their code on GitHub for other developers to discover, use, and improve.
This guide will walk you through the complete process to share an Omnis library on GitHub.
Prerequisites
- An Omnis library to share
- Omnis Studio 8.1 or later
- macOS or Windows
Overview
There are several phases to sharing an Omnis Library with GitHub. This guide will cover all of them, but several steps only need to be performed one per machine or project.
- Phase 1: Setup your computer for GitHub development (once per machine)
- Phase 2: Setup a repository for your project (once per project)
- Phase 3: Add your library to the repository and publish it (once per project)
- Phase 4: Publish changes to your repository (as needed)
Public versus private repositories
Phase 1: Setup your computer for GitHub development
Create a GitHub account
If you don’t already have a GitHub account, head over to https://github.com/join to create a new account on GitHub.
Enter a username, email address, and password, then click Create an account.
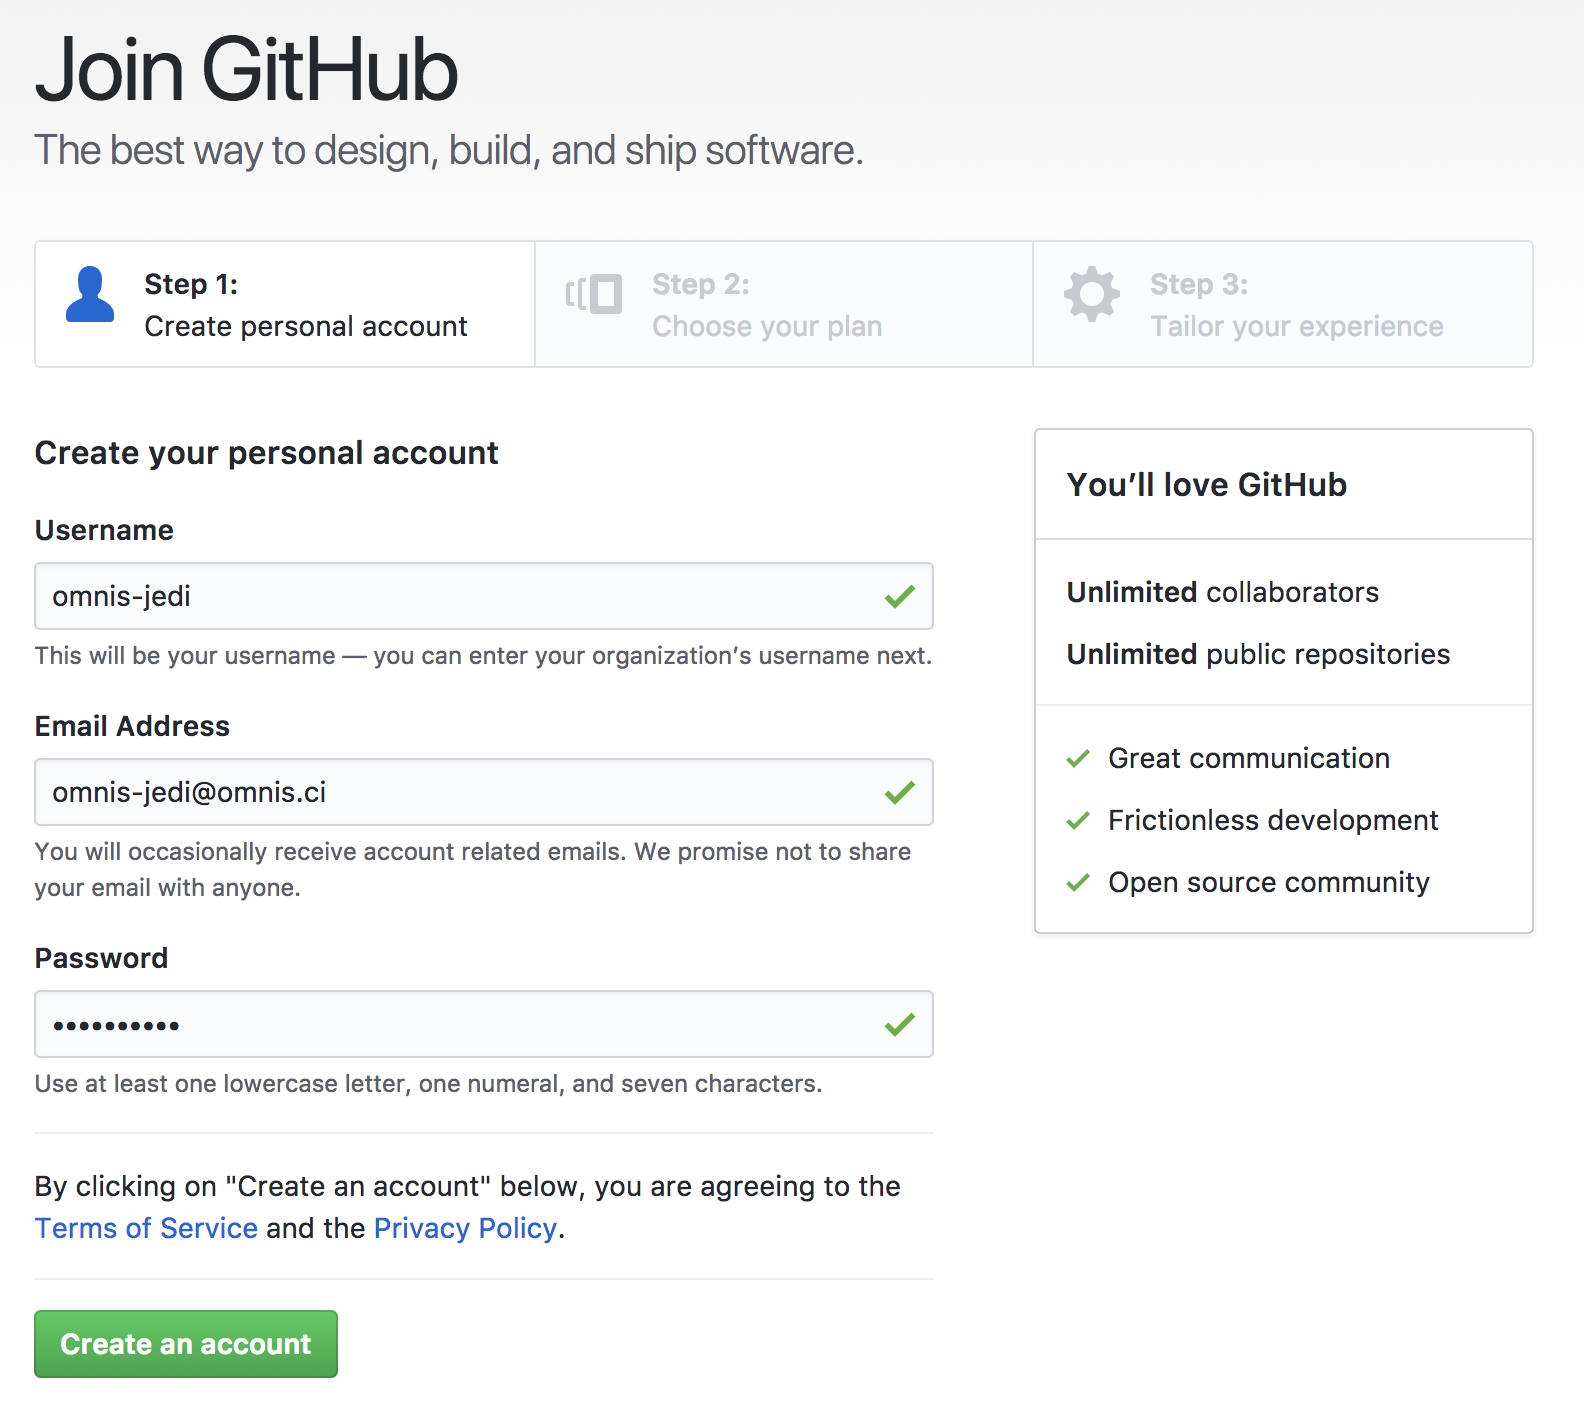
GitHub will send you a verification email. Follow the steps in that email to complete verification.
GitHub will ask you to customize your plan and tailor your experience, but these steps are optional. Complete them if you’d like, or move to the next step.
Install GitHub Desktop
GitHub Desktop is a user-friendly graphical app for working with GitHub repositories. Download and install it from https://desktop.github.com.
Launch GitHub Desktop and choose Sign into GitHub.com.
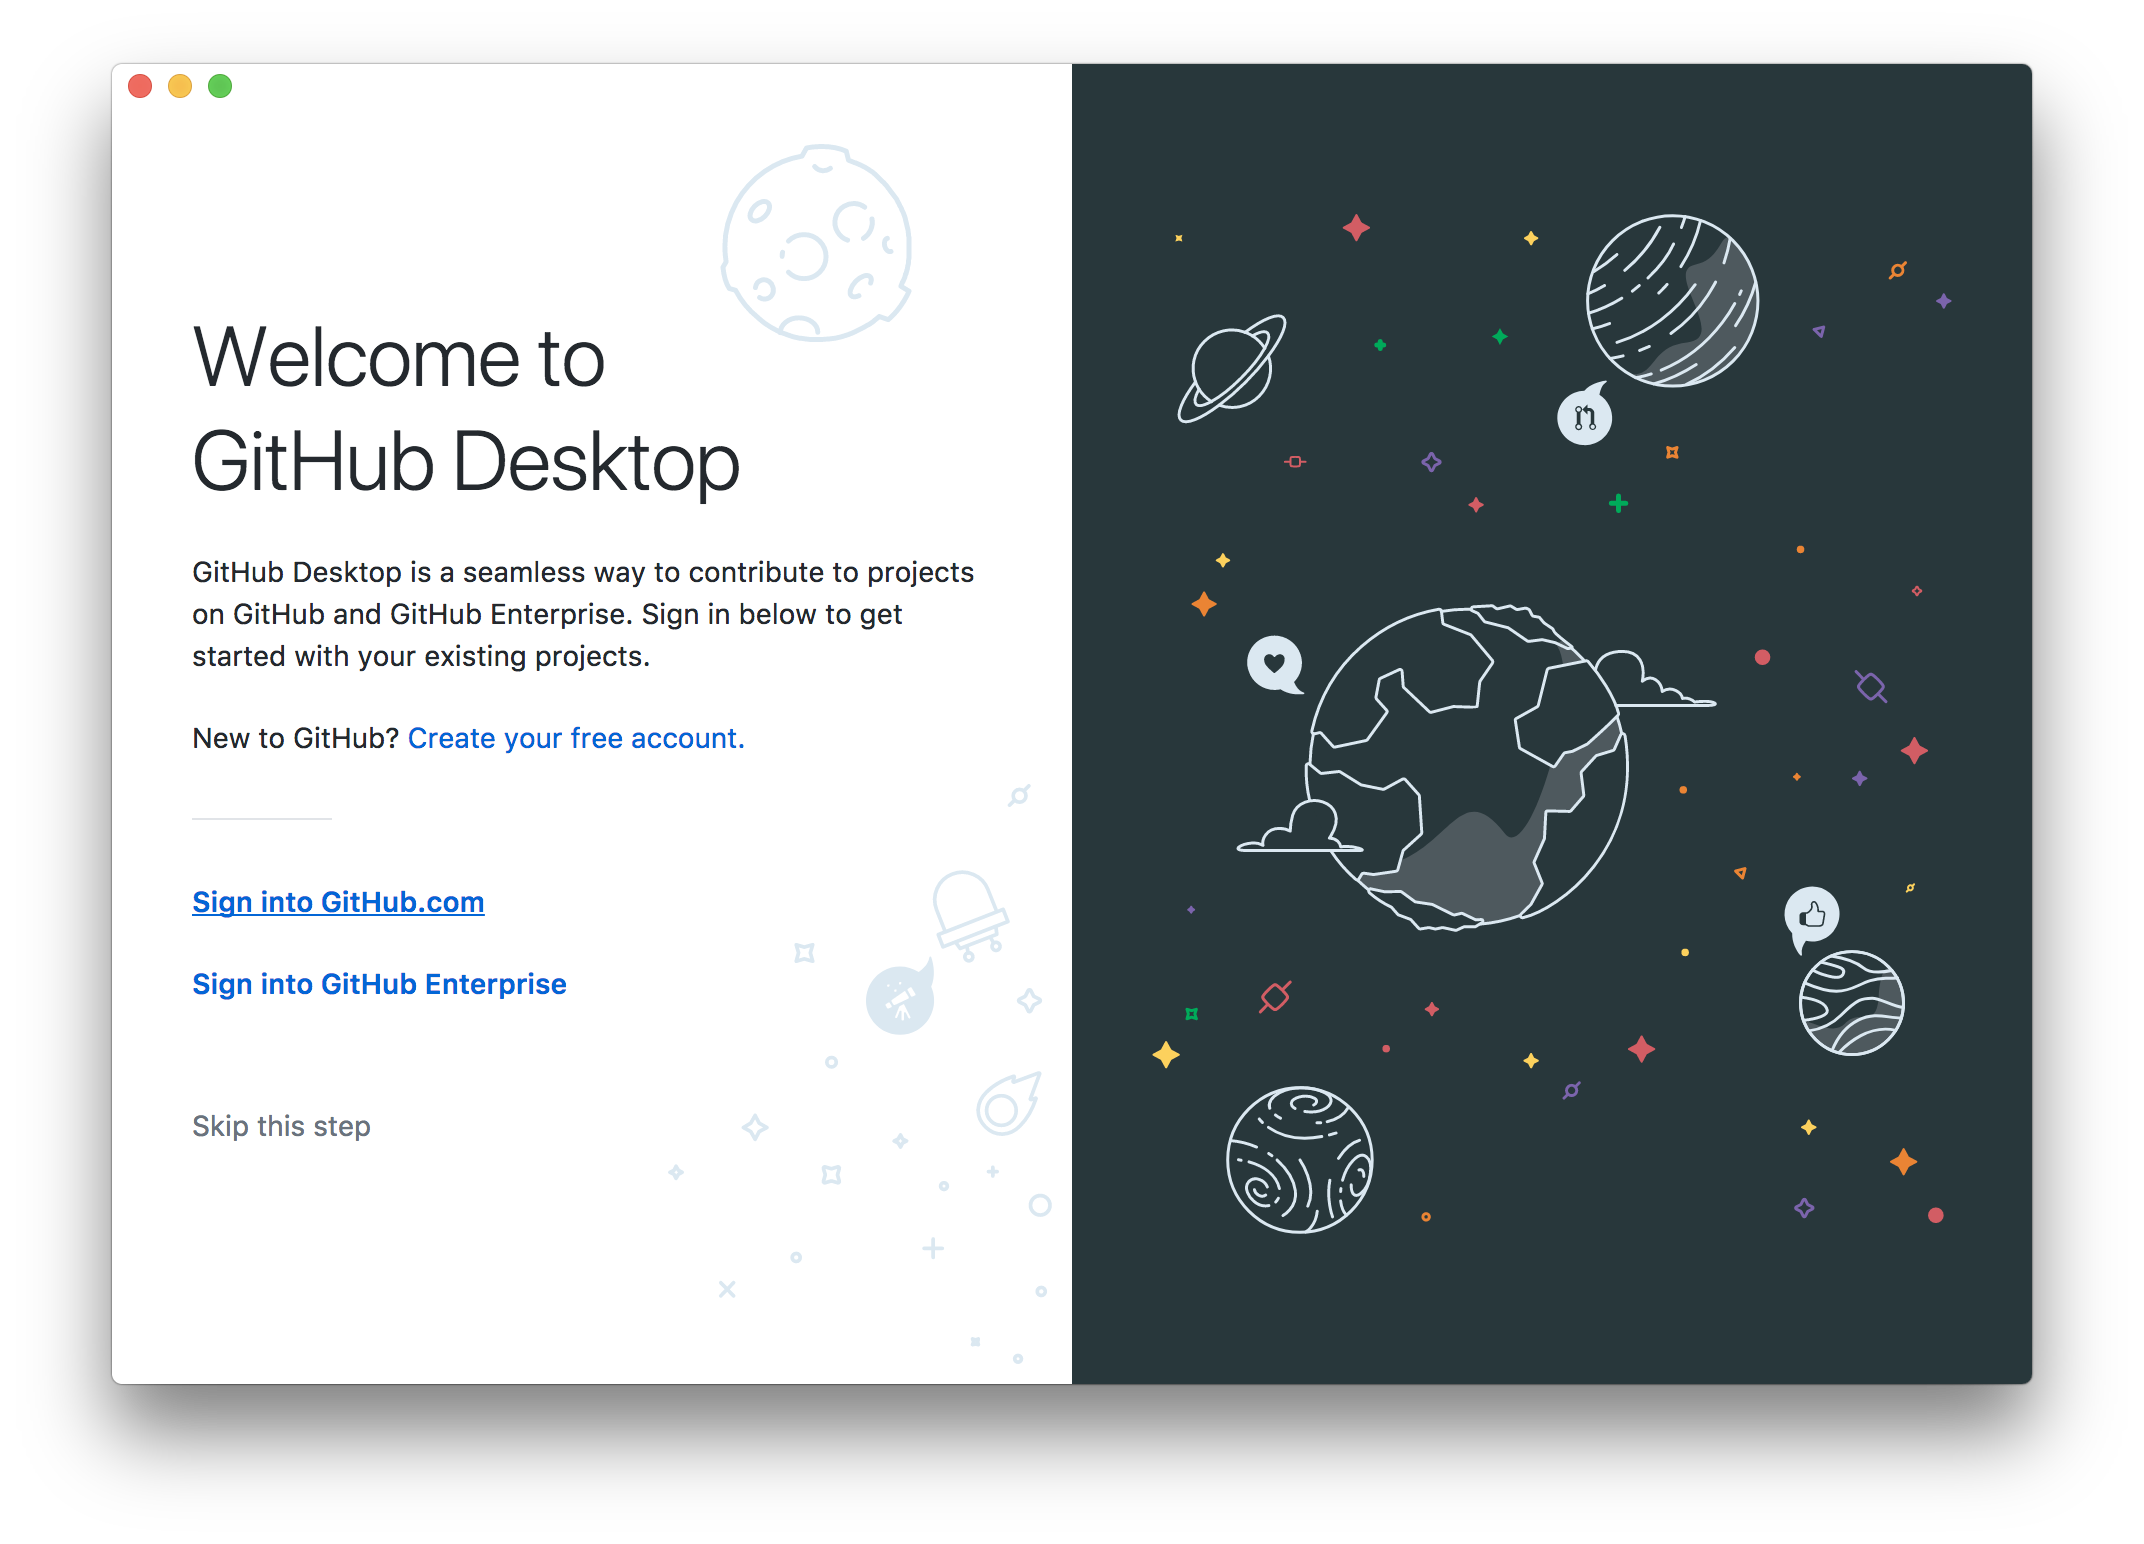
Enter your GitHub user name and password, then click Sign In.

Configure the name and email address that will appear with any changes you commit.
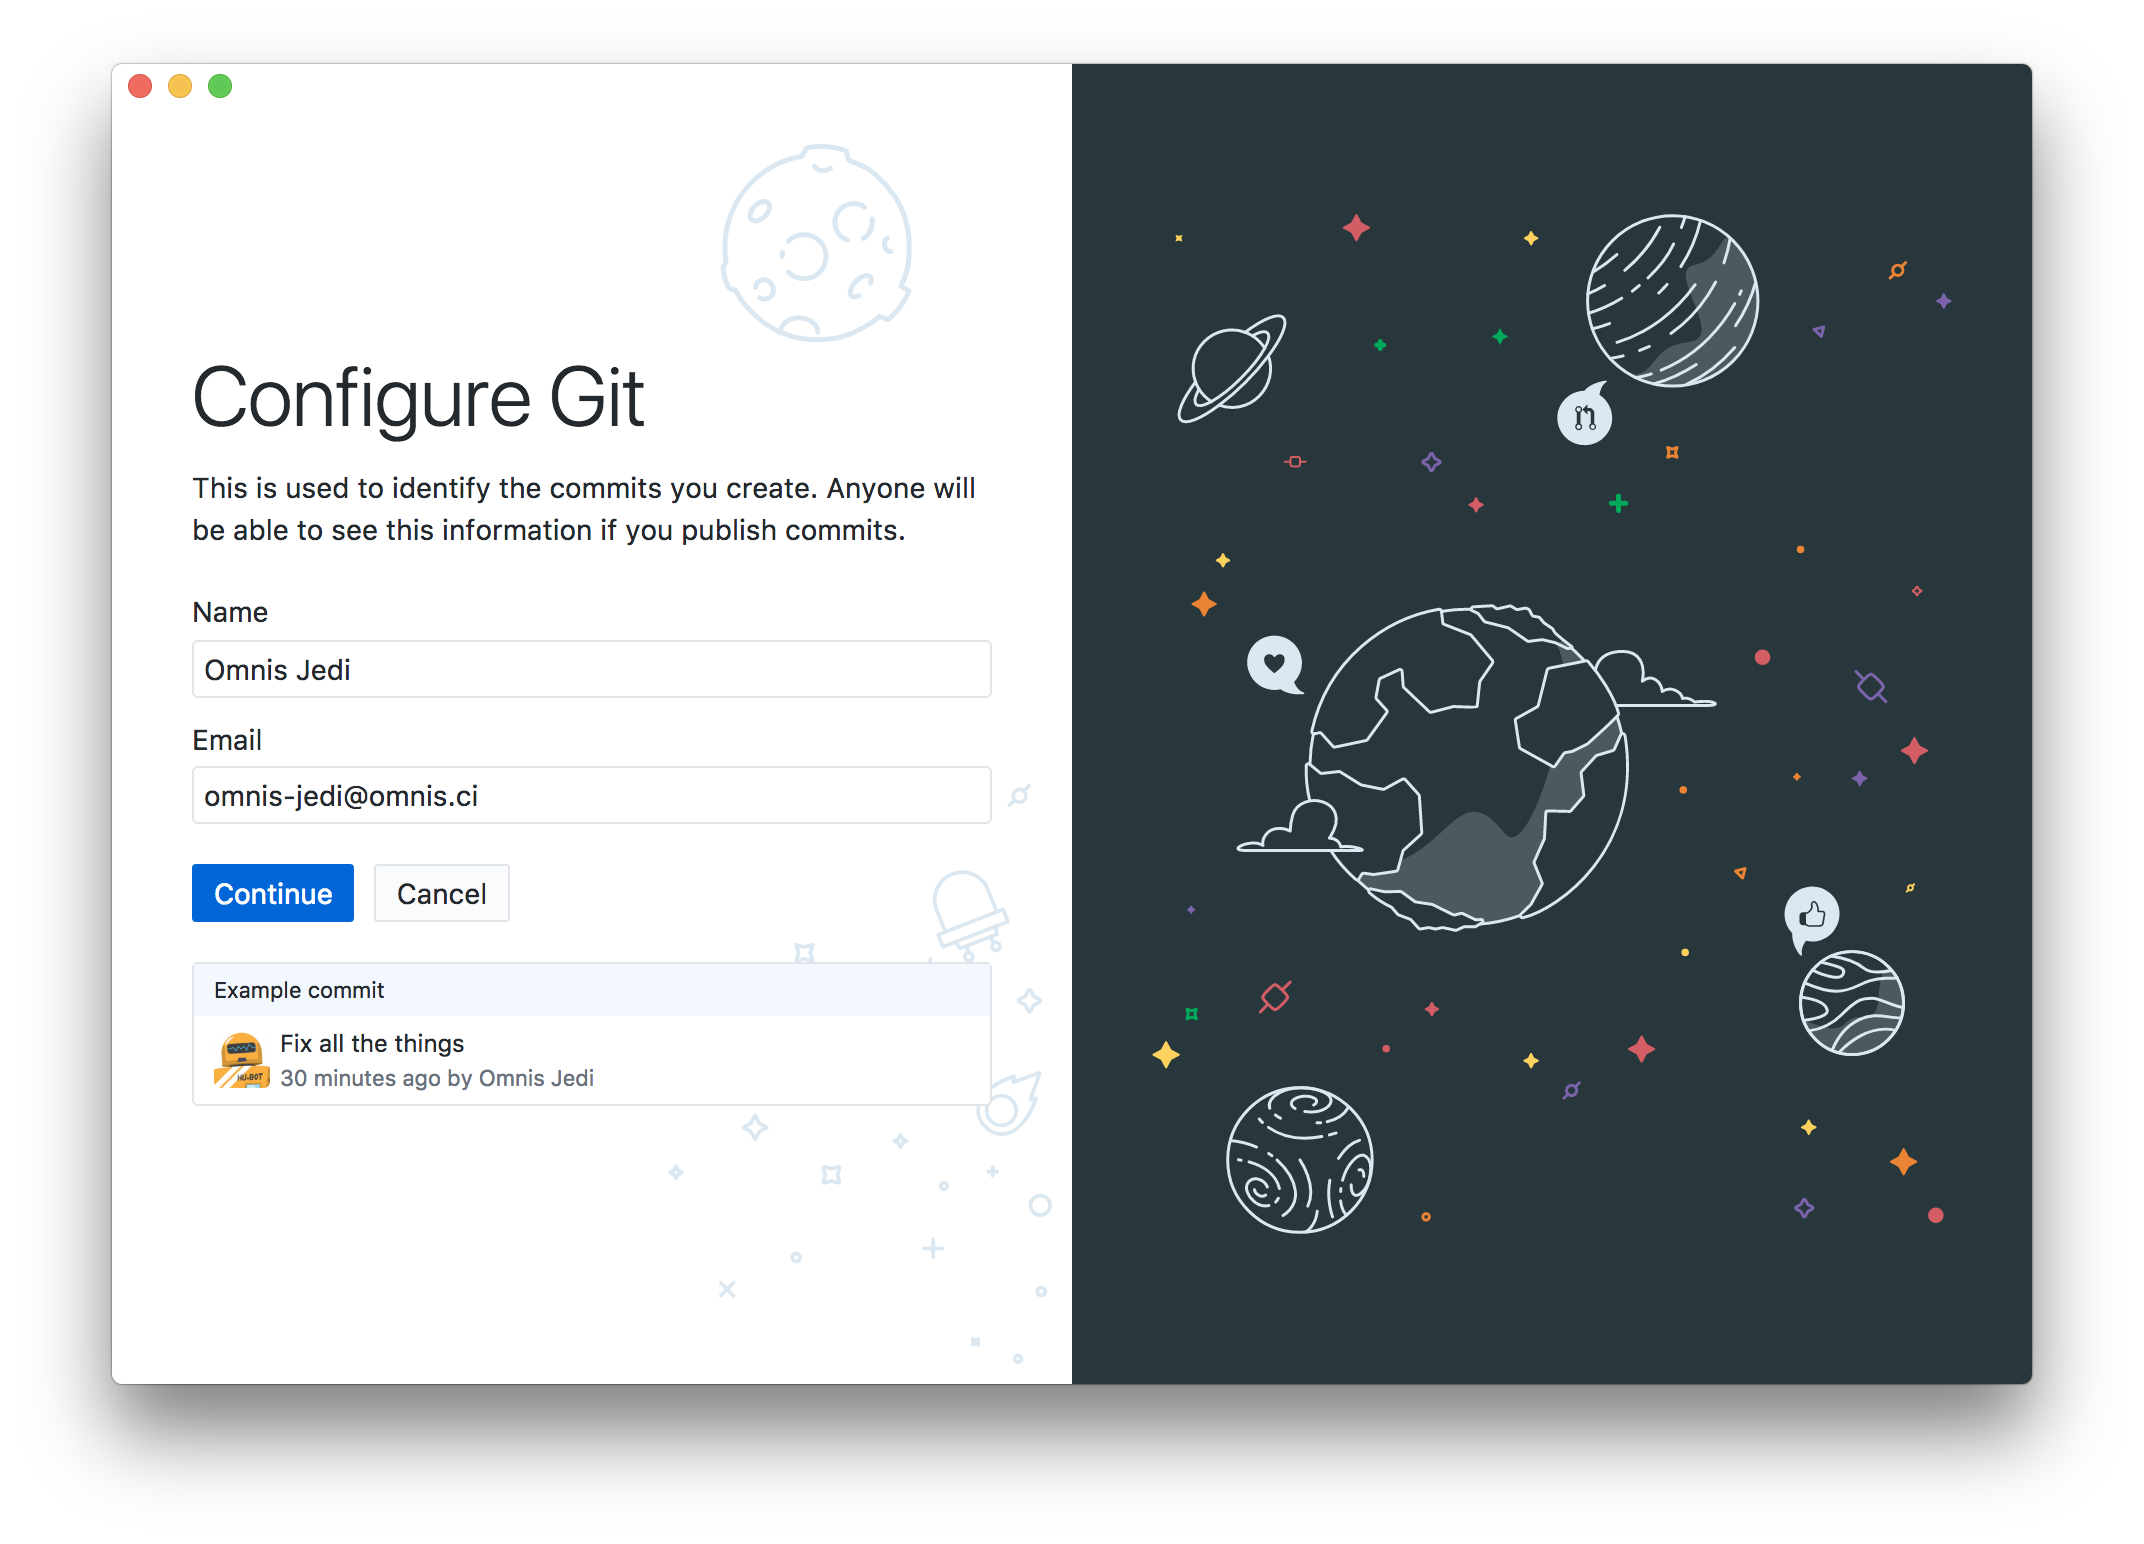
Click Continue and complete the setup.
Phase 2: Setup a repository for your project
Create a repository
GitHub organizes projects into repositories, similar to a project in the Omnis VCS. Open GitHub Desktop and go to File -> New Repository. Fill out the form as follows:
| Field | Value |
|---|---|
| Name | The name for your repository. Try using your library’s name. GitHub’s convention is use dashes for spaces |
| Description | A brief description of this library |
| Local Path | The parent folder that will contain your repository. GitHub Desktop will create this path for you if need be |
| Initialize this project with a README | Checked |
| Git Ignore | None |
| Licence | Choose an appropriate license if you’d like. See choosealicense.com for details on each license |
When finished the form should look something like this:
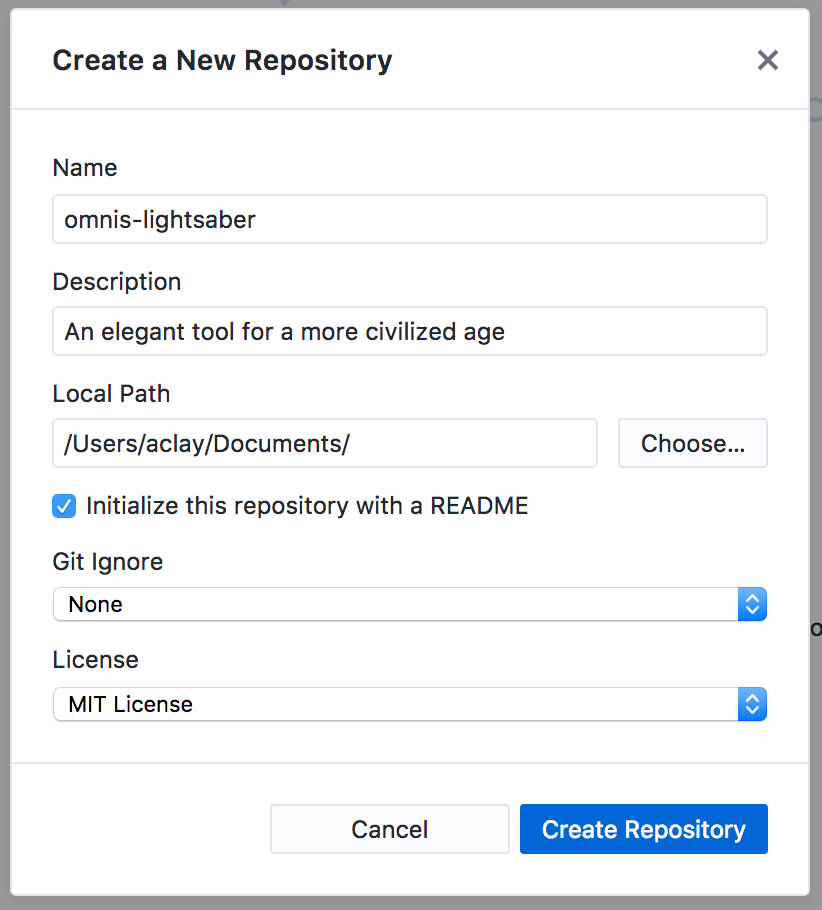
Click Create Repository.
Configure your repository
In GitHub Desktop, choose Repository -> Show in Finder on macOS or Repository -> Show in Explorer on Windows.
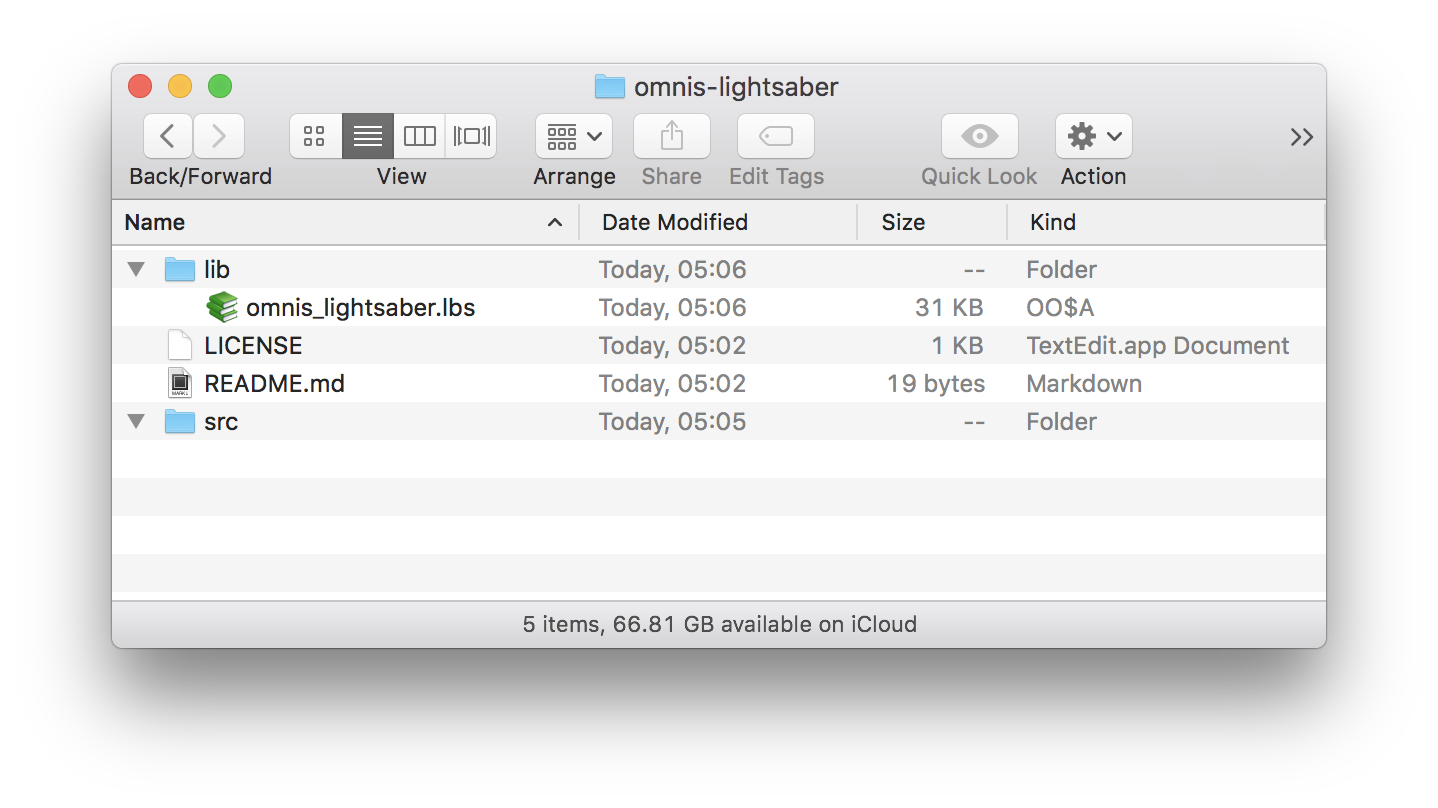
Add a folder called lib and copy or move your Omnis library into it.
Add an empty folder called src. Later in this guide you’ll export the JSON source of your library to this folder.
Your folder should look something like this:
Configure .gitattributes
The Omnis JSON import looks for carriage return characters CR to delimit new lines of code in *.omh files regardless of the platform performing the import. git defaults to managing repository line ending automatically for your current platform. This means you’ll get linefeed LF characters on macOS, Linux, and other Unix-based systems, and carriage return linefeeds CRLF on Windows. Omnis Software recommends using the Windows line endings on all platforms as the linefeed character will be ignored and CRLF line endings are standard on at least one modern platform.
You can configure your repository to use CRLF line endings for Omnis code files using the .gitattributes file. GitHub has a great article that describes how this file works. Your .gitattributes file should contain a section like this:
# Declare files that will always have CRLF line endings on checkout.
* .omh text eol=crlf

# Denote all files that are truly binary and should not be modified.
*.png binary
*.jpg binary
*.lbs binary
You’ll need to create this file using a text editor. Because the file name begins with a dot . it may not be visible by default in the macOS Finder or Windows Explorer.
A convenient way to configure this file is to use a terminal command.
macOS
- Open your repository in GitHub Desktop
- Go to Repository -> Open in Terminal
- Paste in this command:
echo '# Declare files that will always have CRLF line endings on checkout.' > .gitattributes; echo '* .omh text eol=crlf' >> .gitattributes; echo >> .gitattributes; echo '# Denote all files that are truly binary and should not be modified.' >> .gitattributes; echo '*.png binary' >> .gitattributes; echo '*.jpg binary' >> .gitattributes; echo '*.lbs binary' >> .gitattributes;
Windows
- Open your repository in GitHub Desktop
- Go to Repository -> Open in Command Prompt
- Paste in this command:
echo # Declare files that will always have CRLF line endings on checkout. > .gitattributes & echo * .omh text eol=crlf >> .gitattributes & echo. >> .gitattributes & echo # Denote all files that are truly binary and should not be modified. >> .gitattributes & echo *.png binary >> .gitattributes & echo *.jpg binary >> .gitattributes & echo *.lbs binary >> .gitattributes
Configure the README
The README.md file is a great place to provide instructions for using your library. When a visitor views your project on GitHub, the contents of this file are displayed on the main page for the project.
README.md uses the Markdown formatting syntax, which can easily dress up text with heading, lists, and code snippets. Checkout the Mastering Markdown guide on GitHub for help with the Markdown syntax.
You might want to use an app that specializes in working with Markdown to edit this file. Try MarkdownPad on Windows and MacDown on macOS, both free.
You can also copy a sample README.md and customize it for your project.
Phase 3: Add your library to the repository and publish it
Export your library
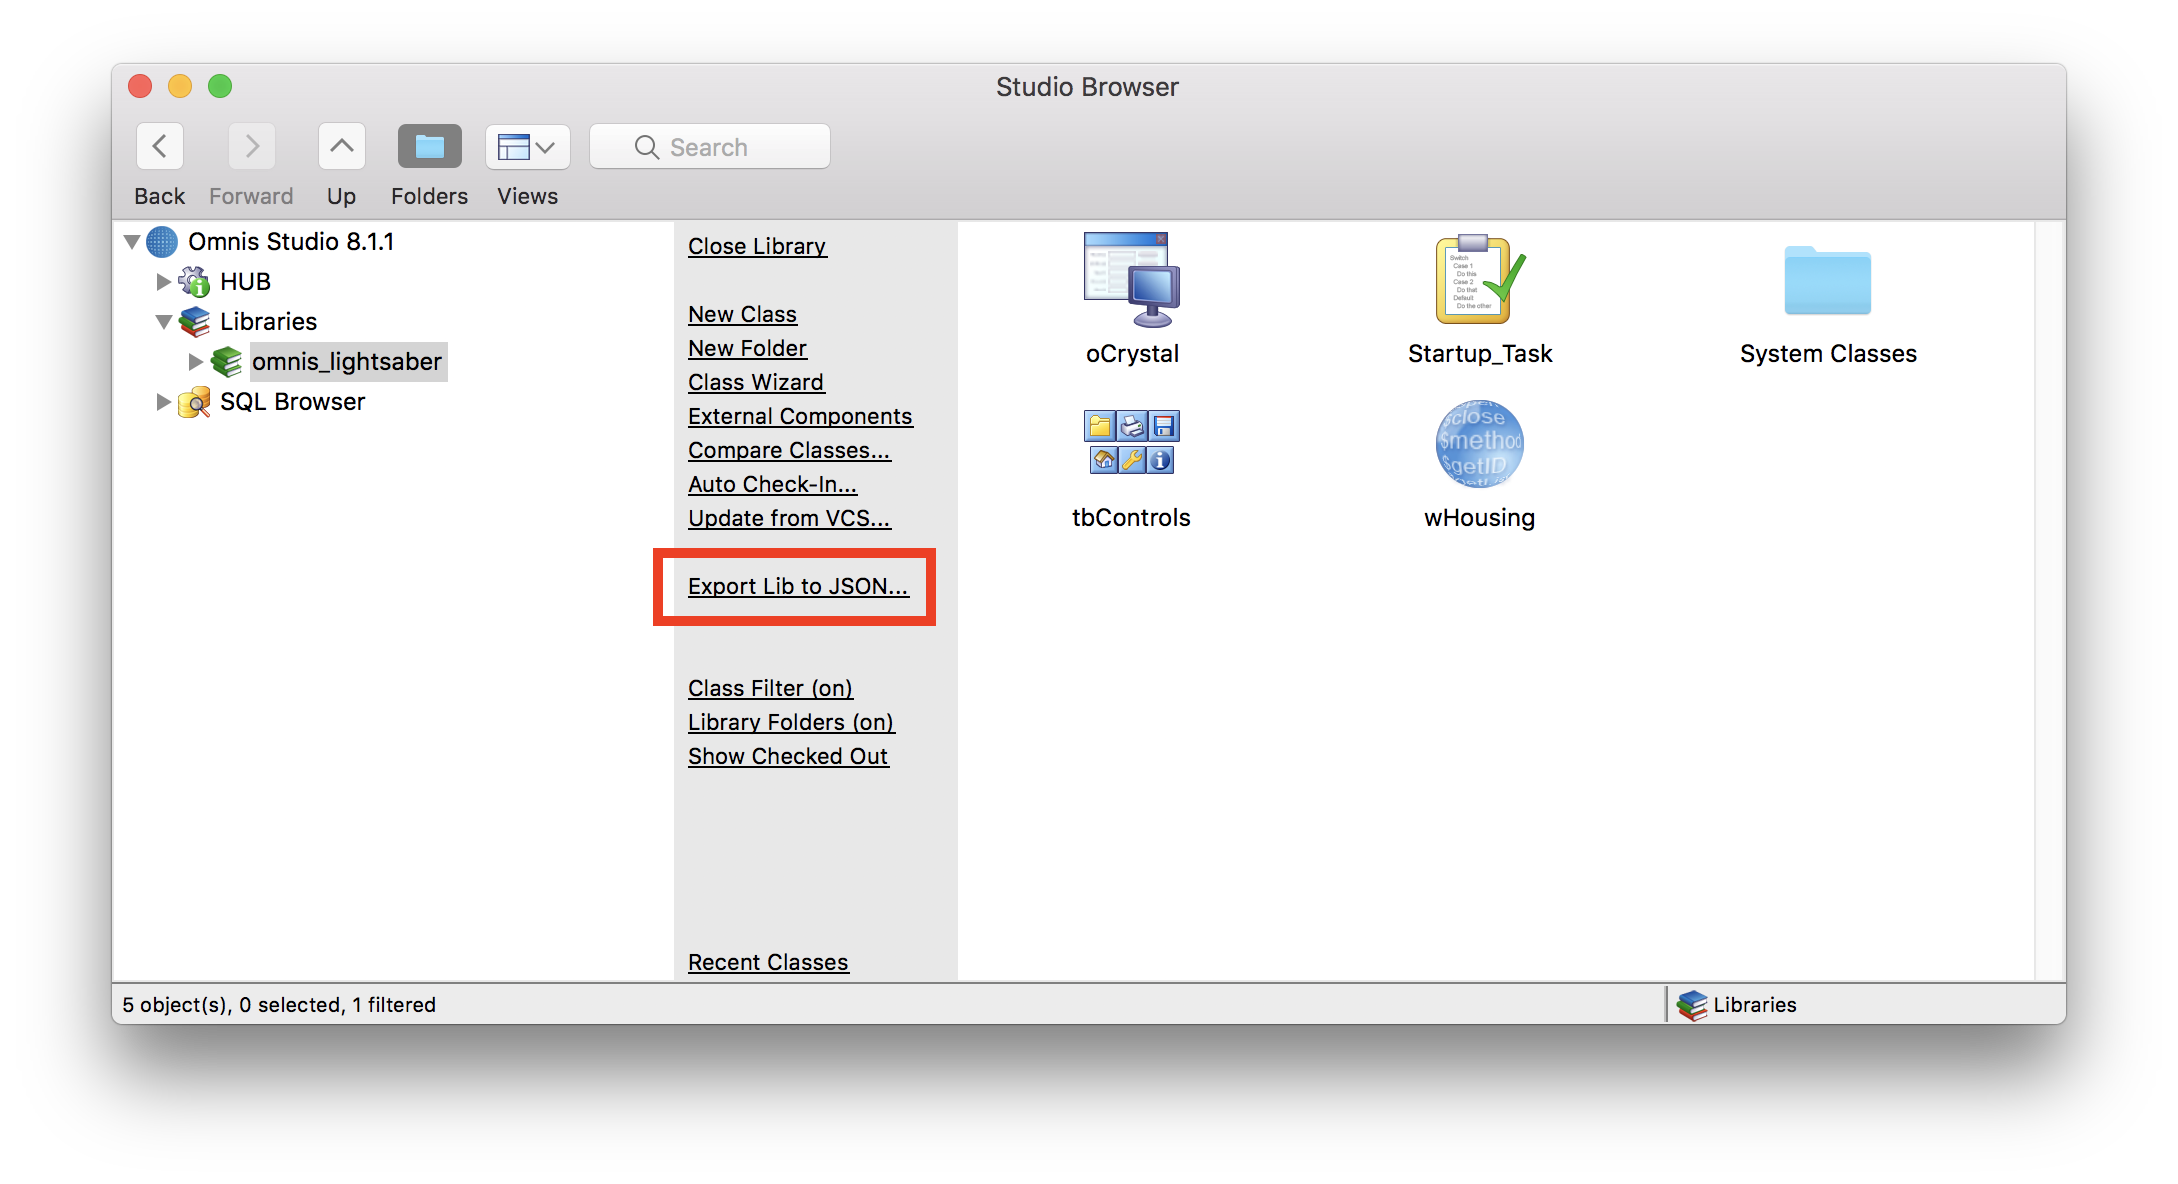
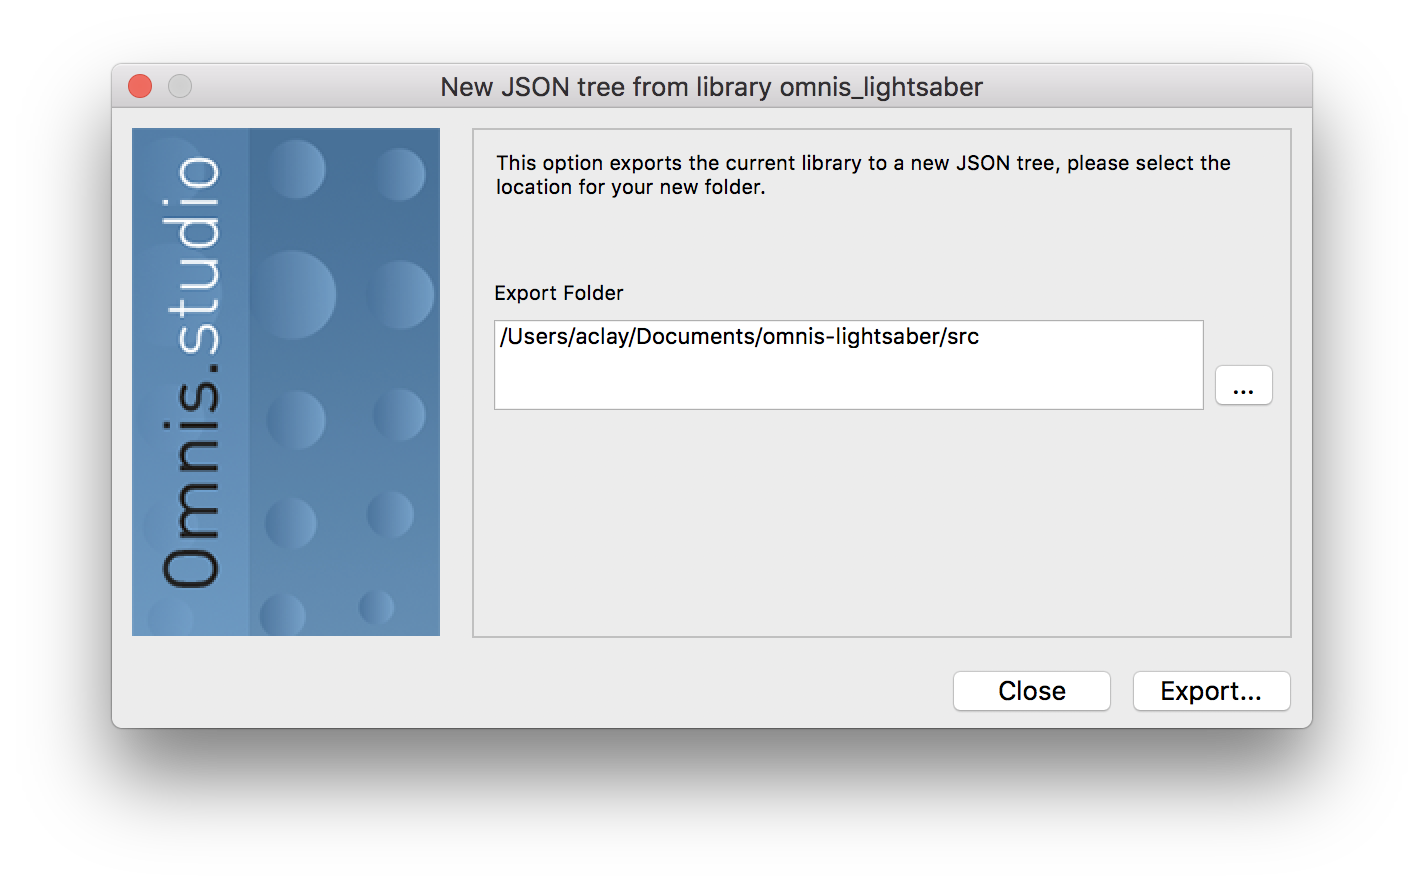
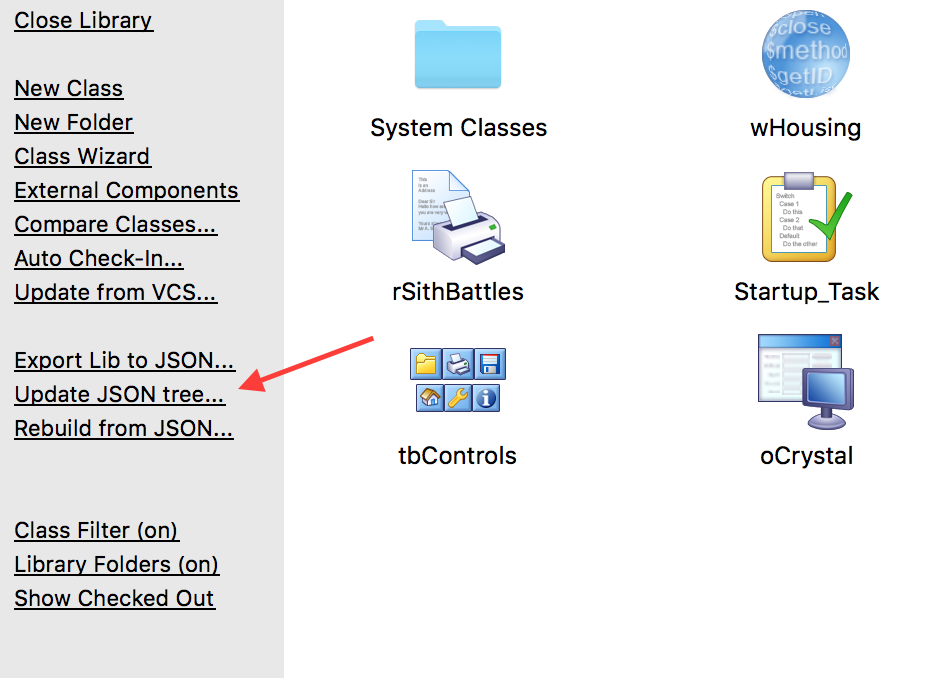
Open your library from lib/ folder using Omnis Studio. Select the library in the Studio Browser and click Export Lib to JSON… in the sidebar.
Omnis will prompt for a location for the export. Choose the src/ folder in your repository.
Import your library
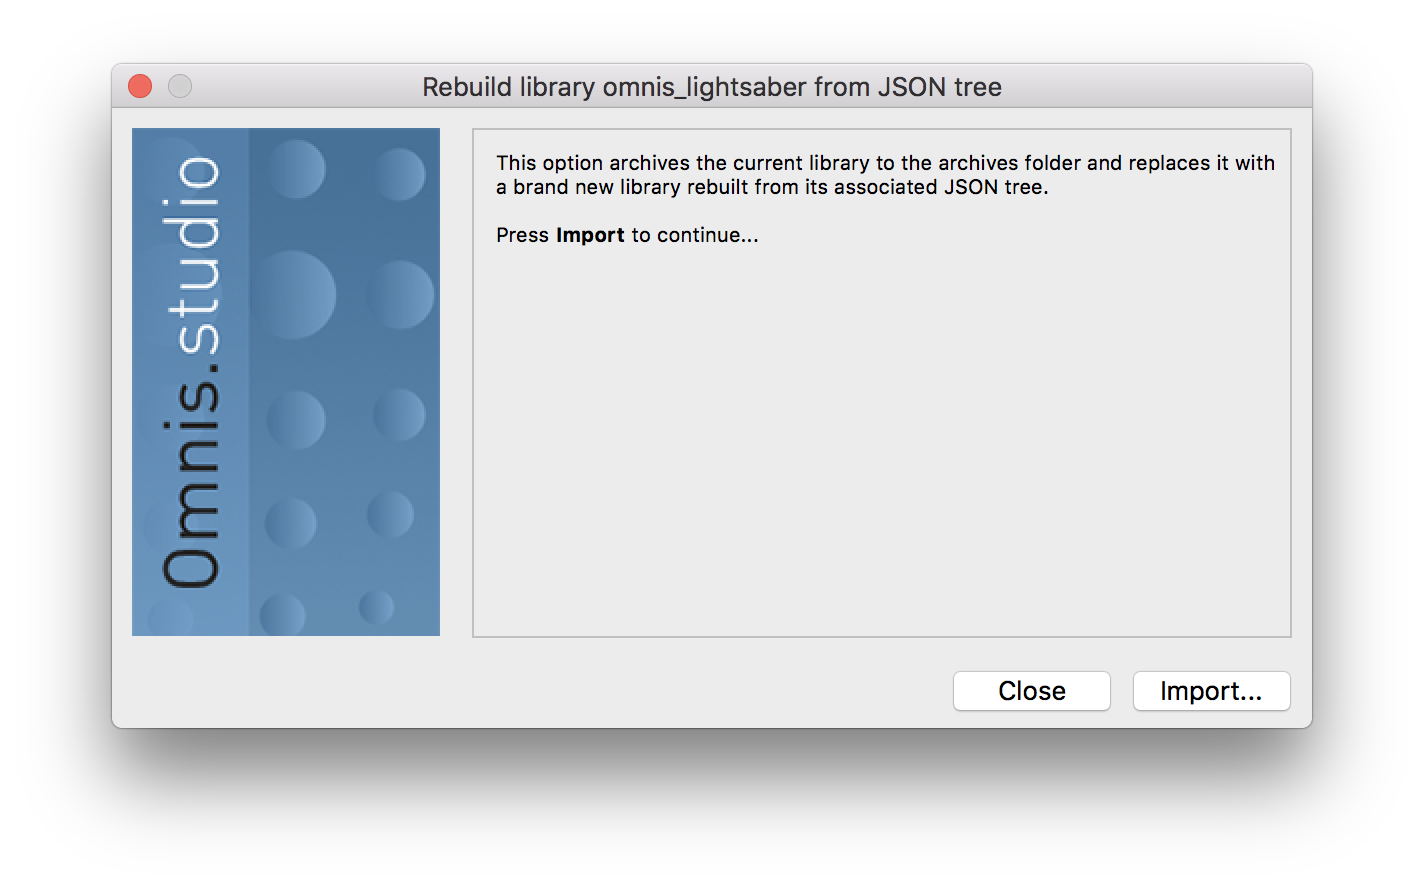
It’s a good idea to ensure your library can be rebuilt from the JSON export. The Studio Browser will now present an option to Rebuild from JSON….
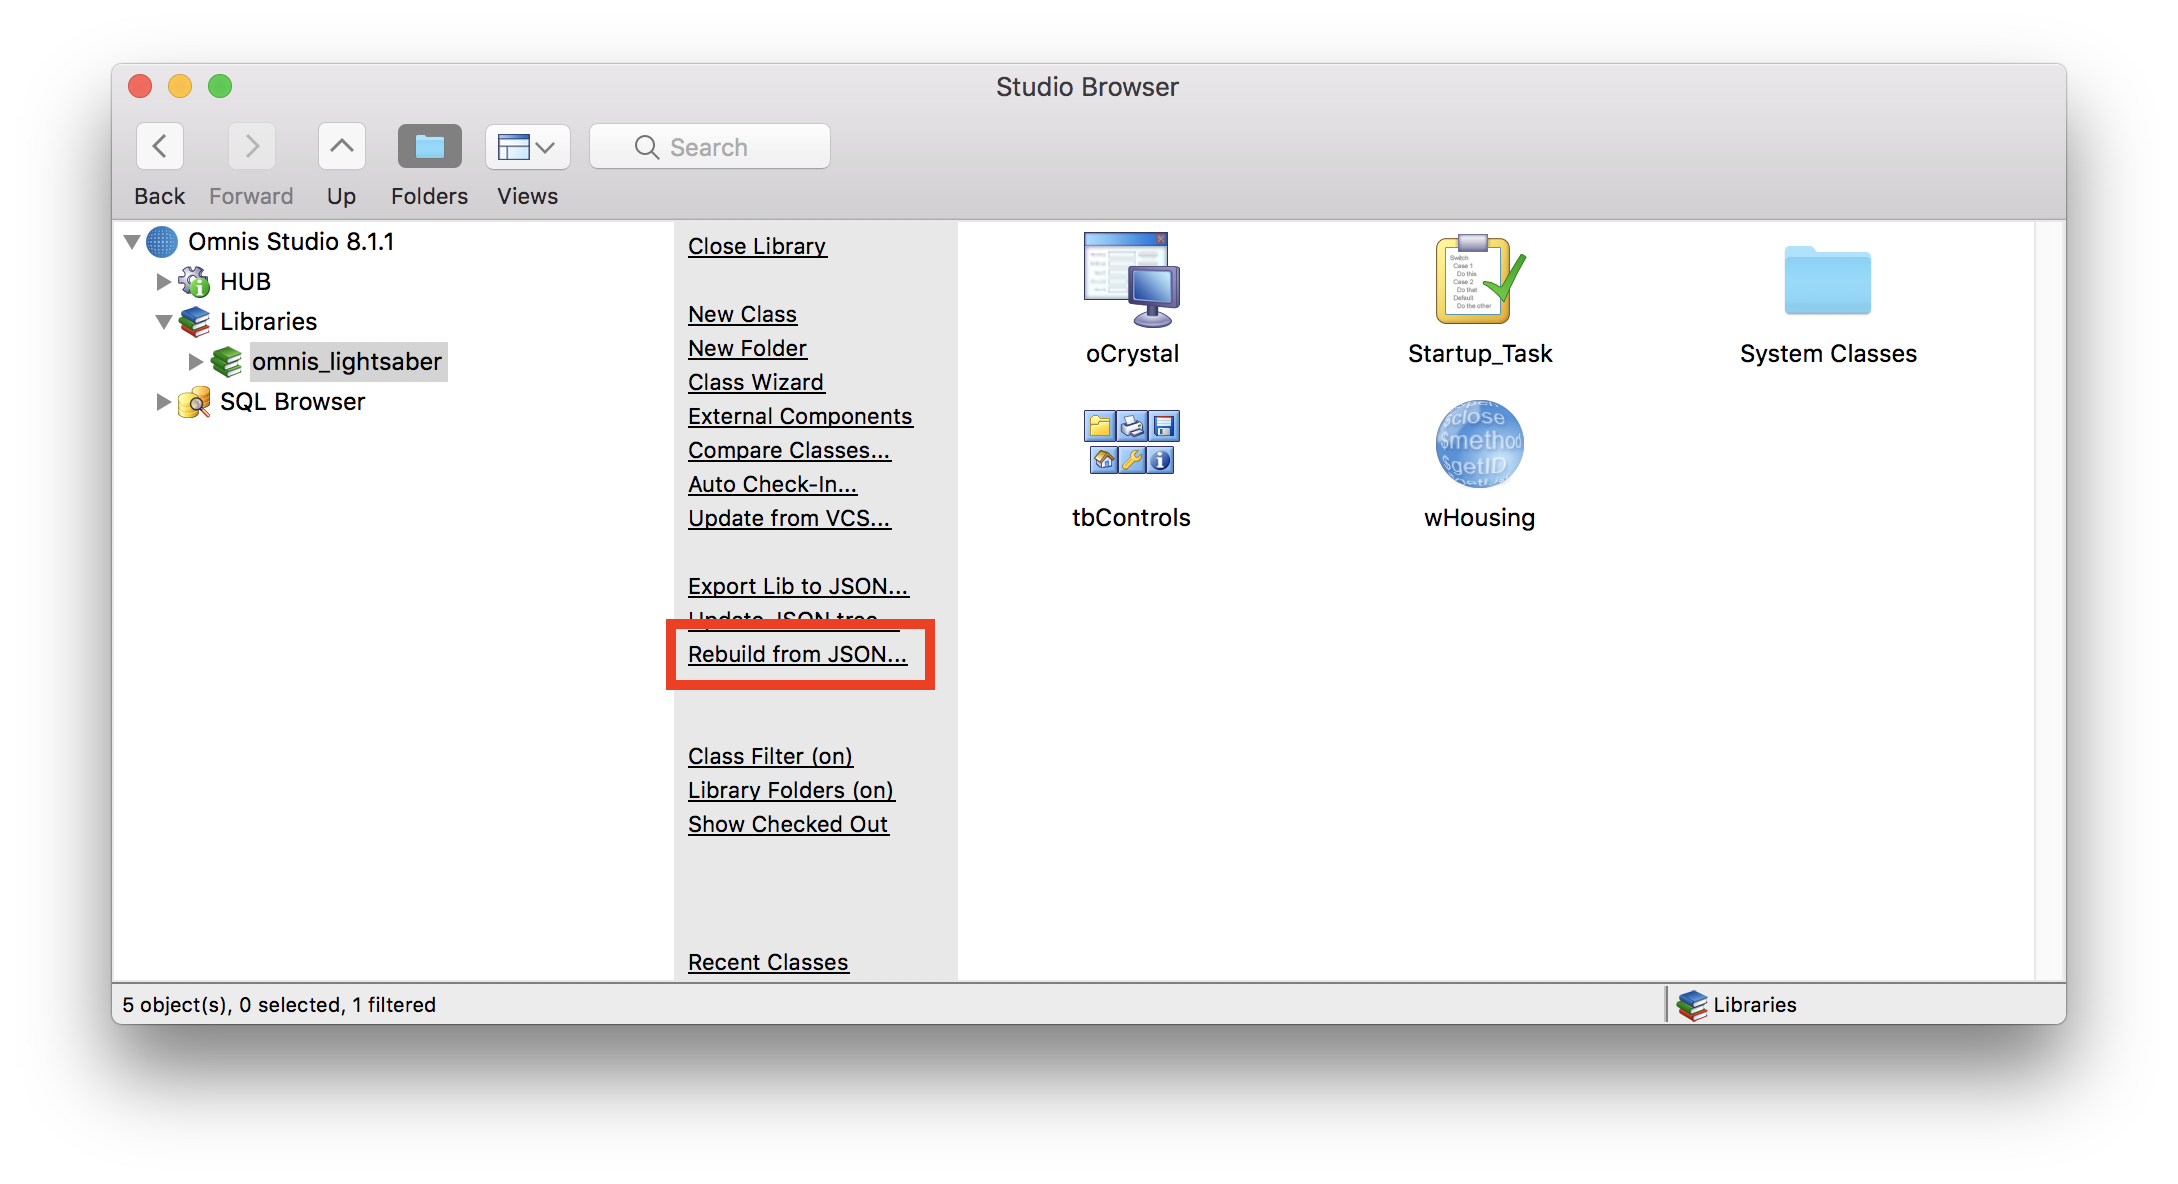
Click Rebuild from JSON…, then click Import on the confirmation prompt.
Review your Omnis library to ensure it works properly. If you need to access the original library, click Restore Library… in the Studio Browser sidebar. You can also find your library on disk in these locations:
| Platform | Default Path |
|---|---|
| macOS | ~/Library/Application Support/Omnis/Omnis Studio [Version] x64/archives |
| Windows | %LOCALAPPDATA%/Omnis/Omnis Studio [Version] x64/archives |
Commit your changes
Return to GitHub Desktop and you will see a number of files marked for change. Enter a summary for your commit, such as Initial commit.
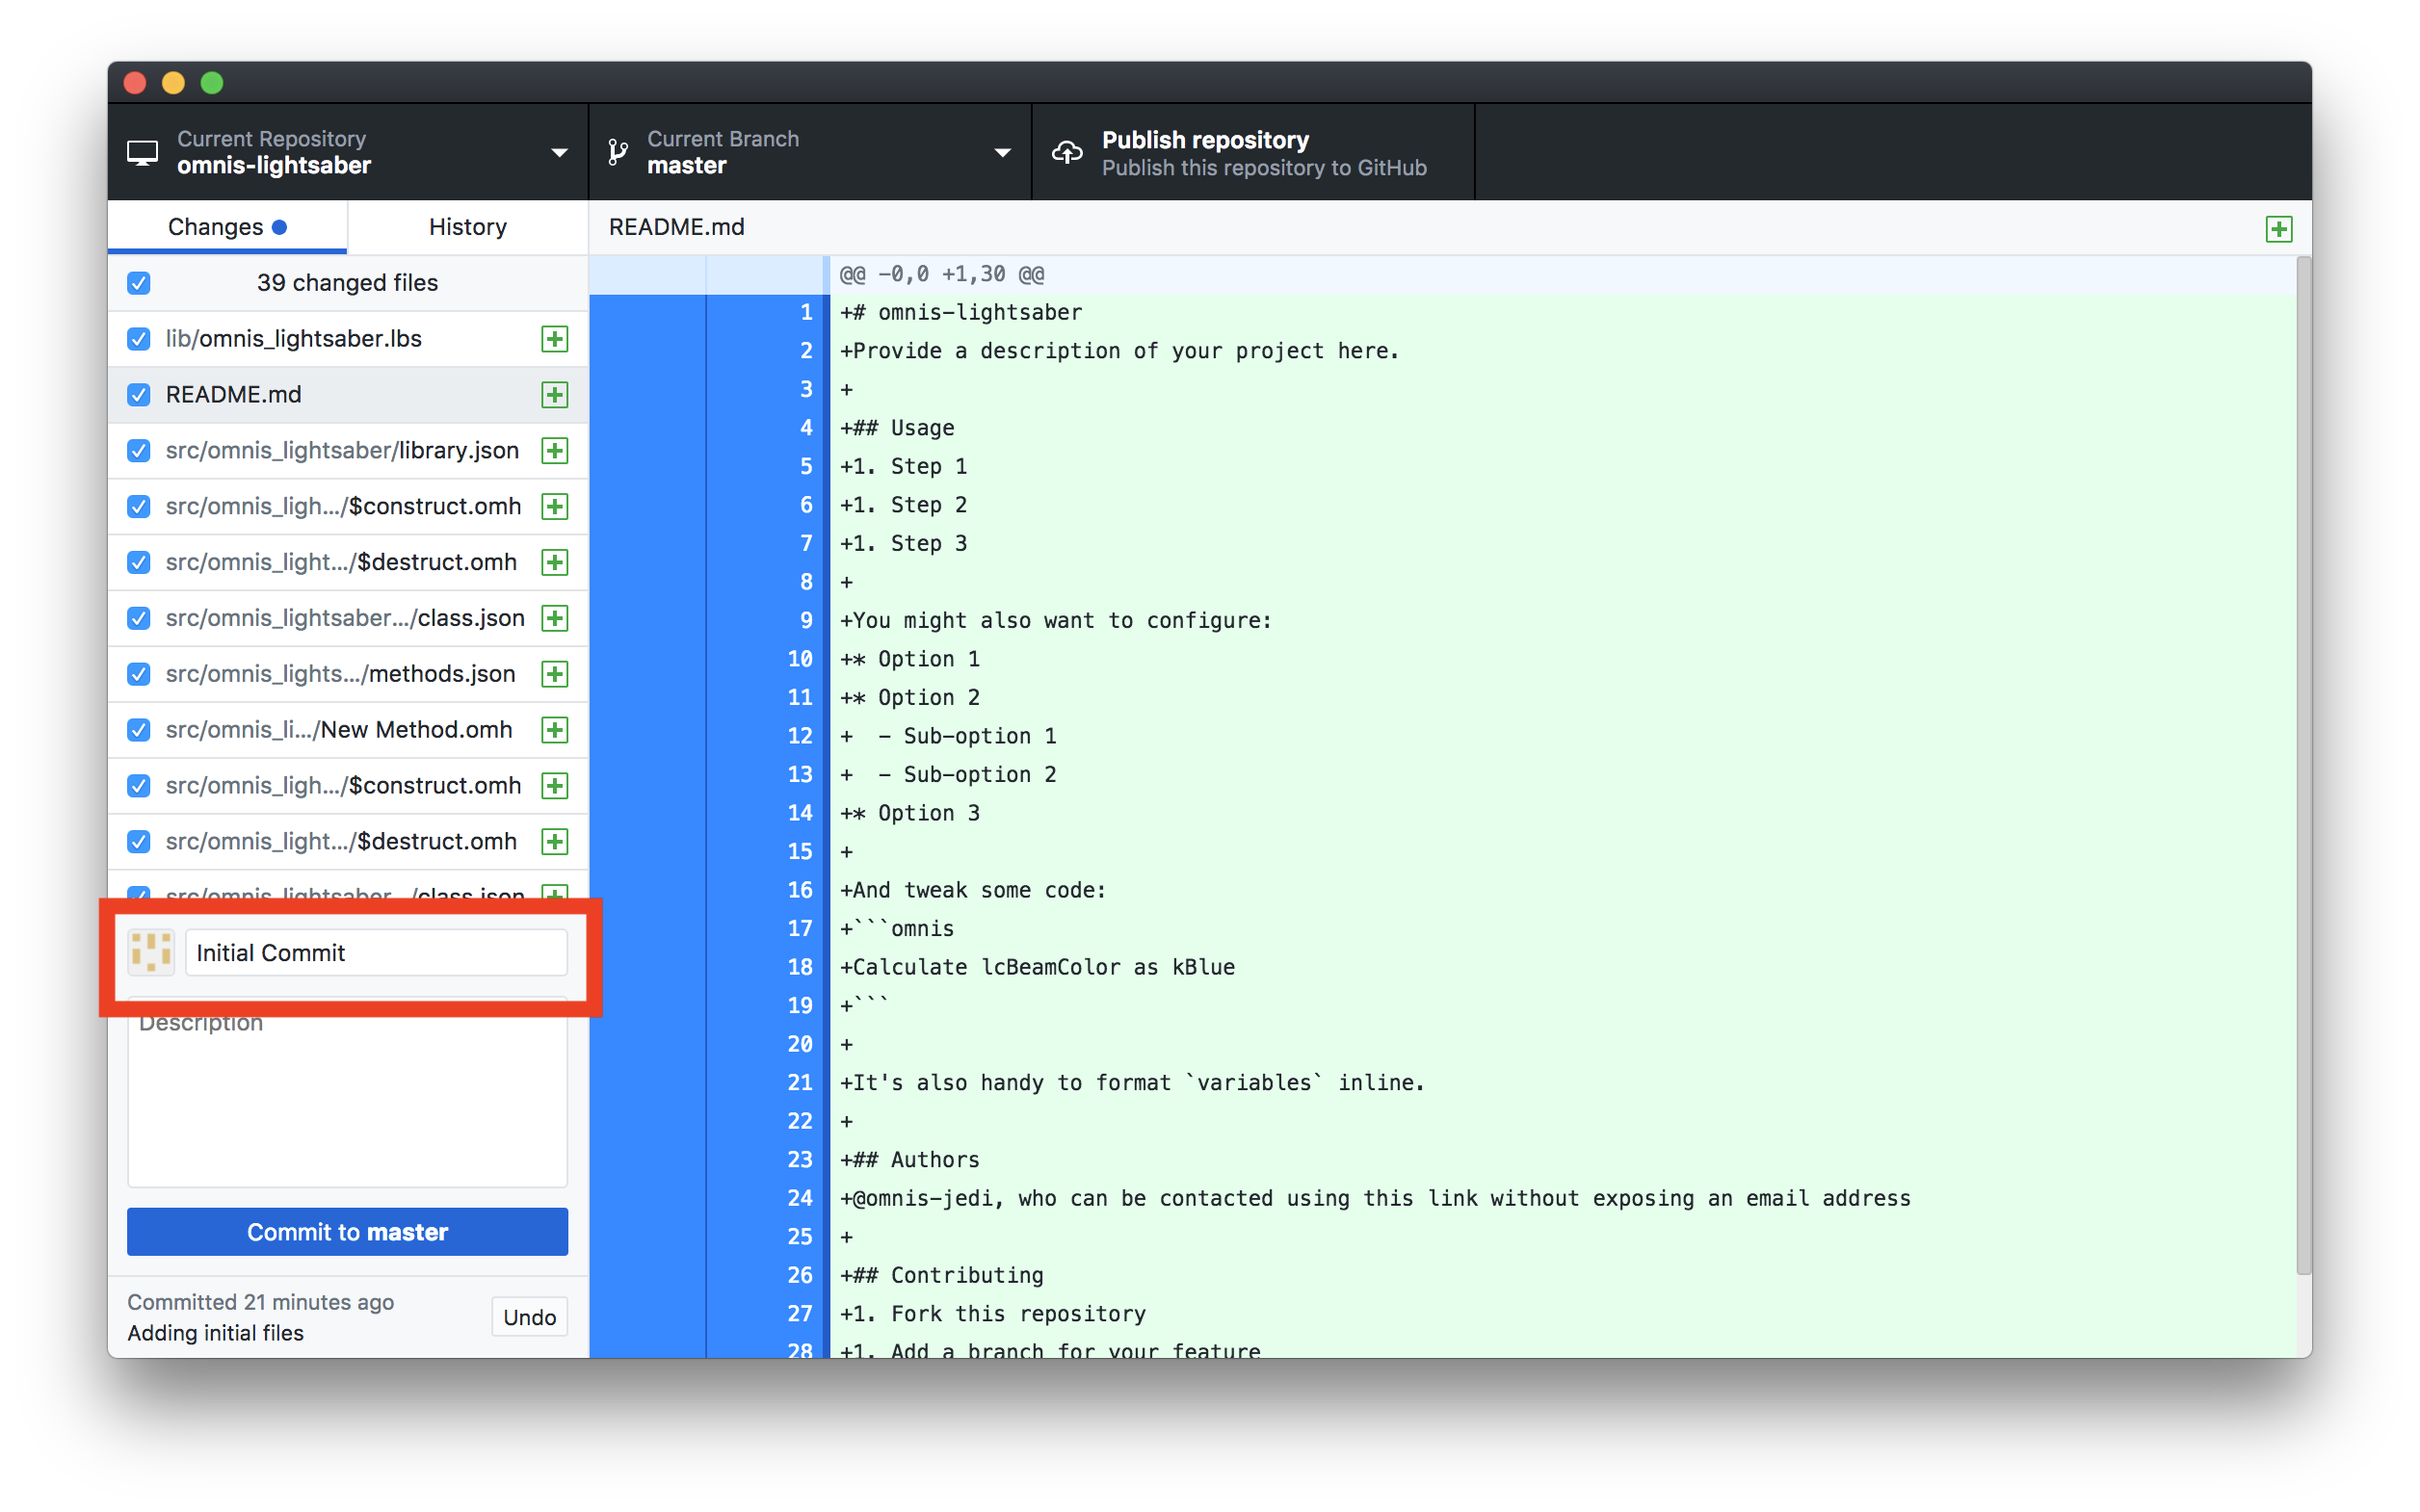
Click Commit to master and your changes will be saved to the local repository on your machine.
Publish your repository to GitHub
Click Publish Repository in the GitHub Desktop toolbar to share your repository with the world.

Fill out a description and uncheck Keep this code private. Leave the organization as None.
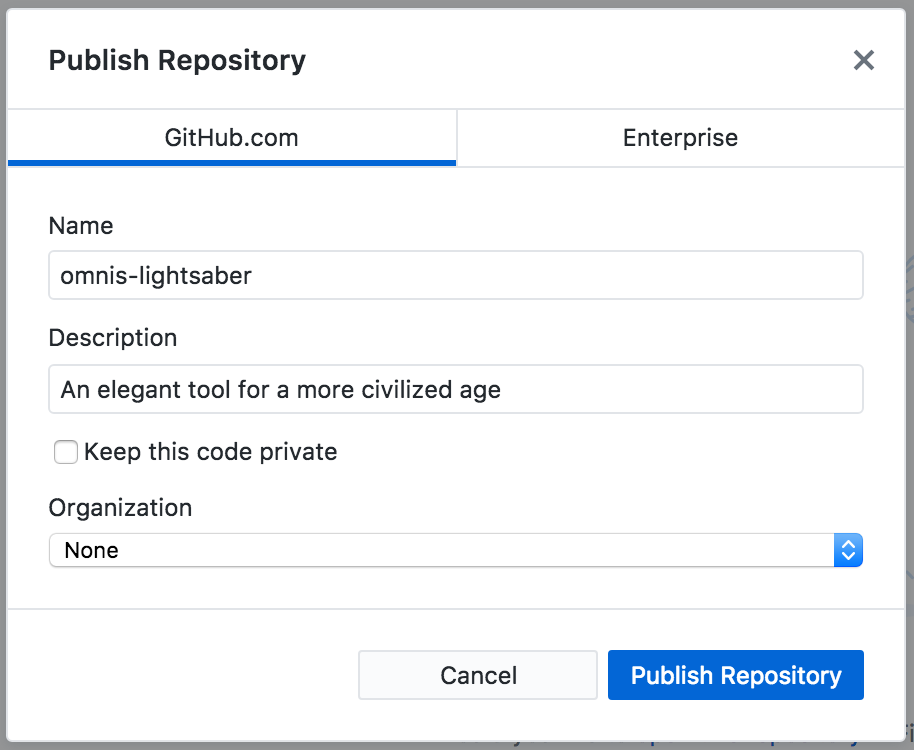
Click Publish Repository and GitHub Desktop will push your code to GitHub.
Once the repository is posted, go to Repository -> View on GitHub to see it online. Note the URL for your repository—this is what you should share for other developers to access your library.
Share your repository
Share the link to your repository on GitHub to any or all of these news channels:
- Post under the News form on the Omnis Developer portal
- Email developer@omnis.net with a request to add your library to the Libraries section of the Omnis Developer portal. Be sure to include a link to repository on GitHub and a brief description of what the library does
- Post an announcement to the Omnis Developer List
- Email the link directly
Developers can download your library directly from the lib/ folder in your repository, or they can clone the repository and build the lbs from src/.
Phase 4: Publish changes to your repository
When you need to change the library, make them in the lbs file in the lib/ folder of your repository.
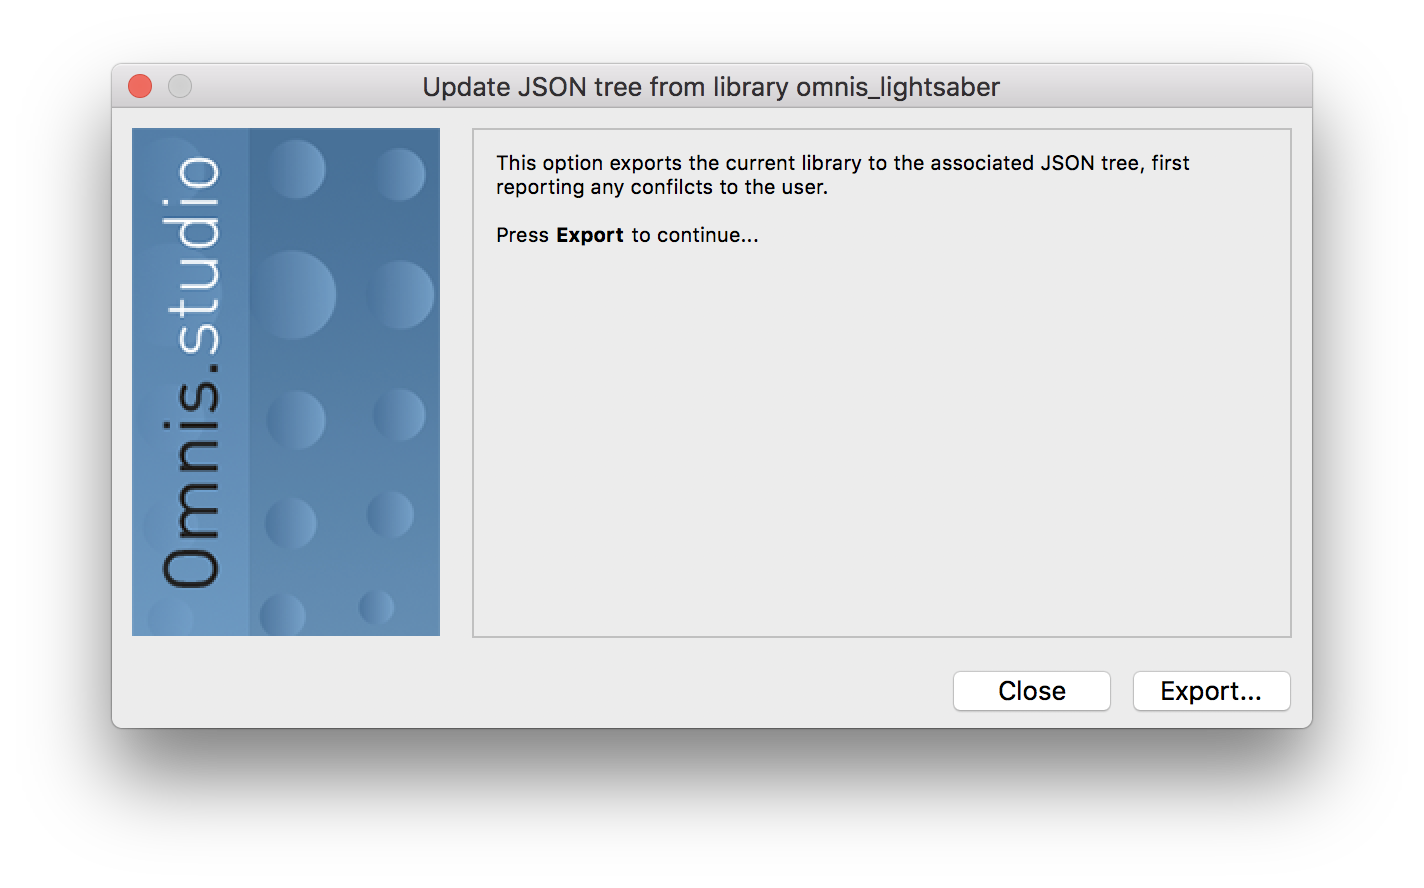
Next, open the Studio Browser and select your library. Click Update JSON tree… in the sidebar.
Confirm you want to do this.
Open GitHub Desktop and review your changes. Check the changes you’d like to commit and enter a summary and any commit notes.
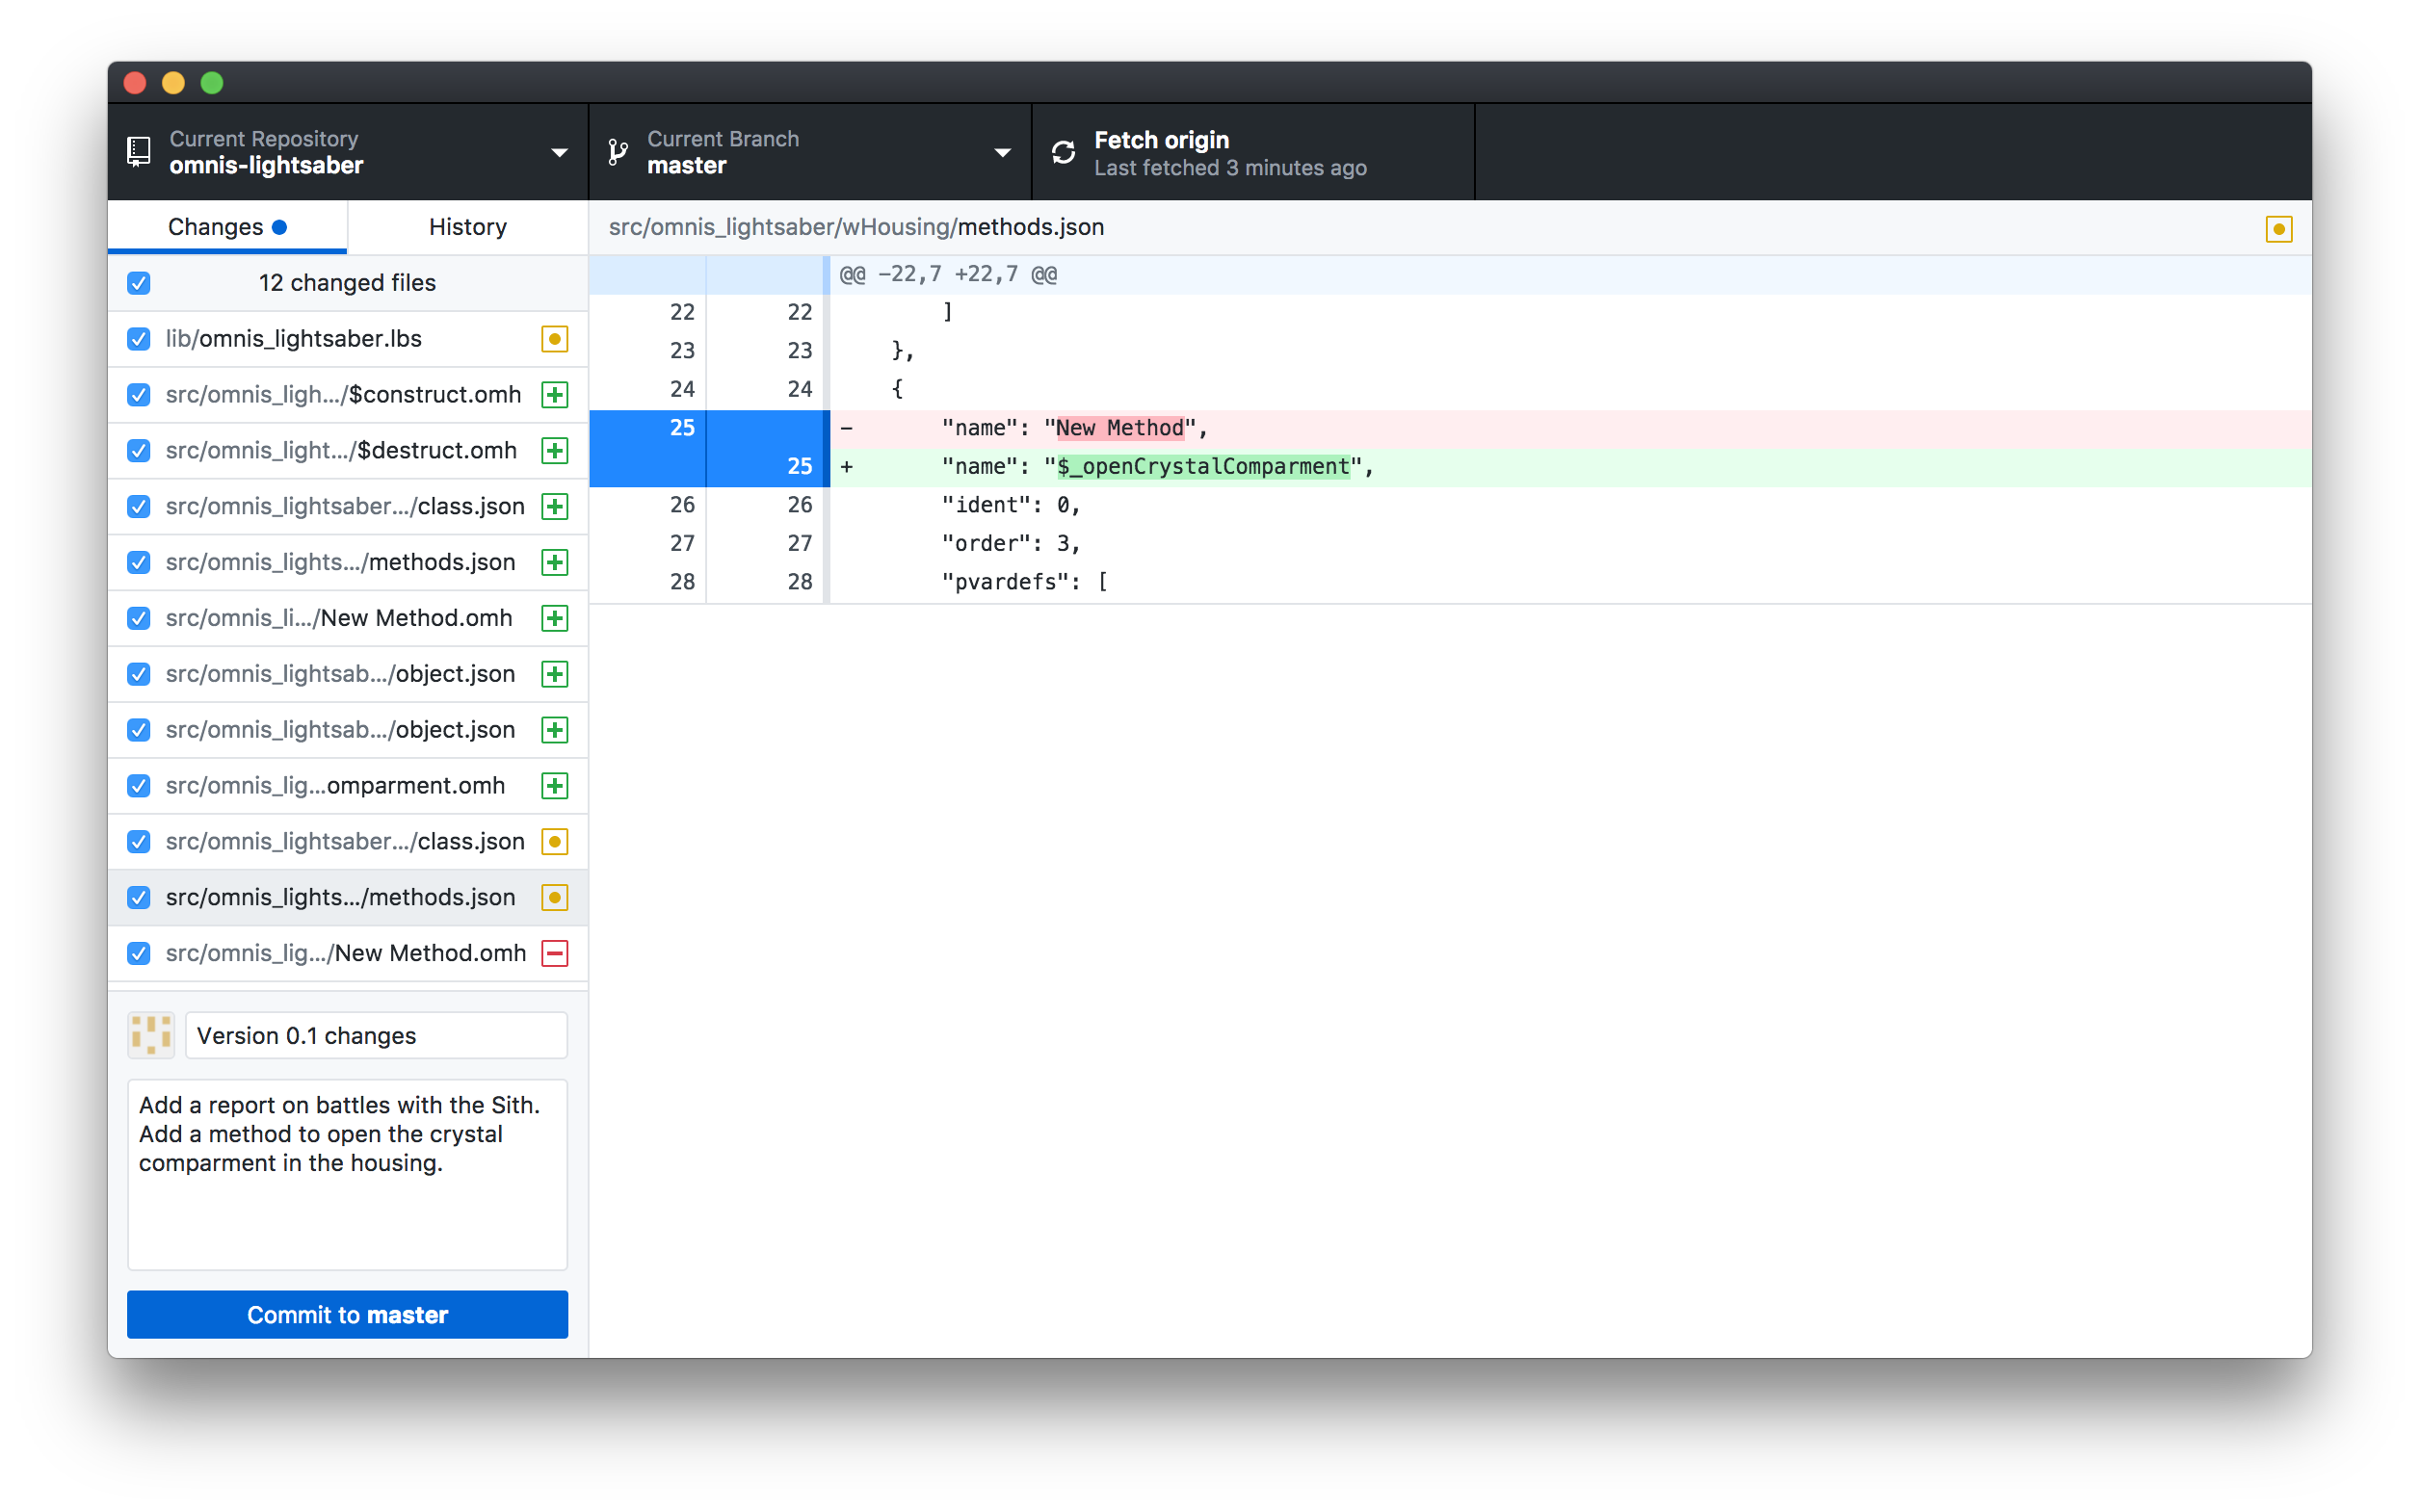
Click Commit to master to save the changes locally, then click Push Origin in the toolbar to upload your changes to GitHub.

Developers can now download an updated lbs with your changes, or pull the src and import it directly into Omnis.